
I recently used a website titled Total Yearbooks. This is an interesting and fun site if you are like me and have a little “scrapbooking mom” in you. I used to scrapbook when my kids were babies, so I couldn’t resist trying this out. The result? Total fun!
Total Yearbooks is a website where you can create a memory book in “three easy steps” and have it shipped to your home. Its main purpose is to provide a means for home schools to create an affordable yearbook. However, there are other templates which can serve scrapbooking families.
For the purposes of this review, I went to the Total Yearbooks website and made a scrapbook of when my girls participated in the high school play "Wizard of Oz" in November.
First, I went to the Total Yearbooks website and created an account. Once I was logged in, it brought me to the “Create a New Project” page.

There were three choices: the “PDF Publisher Wizard,” “Book Designer,” or “Designer Templates.”
I chose Book Designer because here I could drag and drop my uploaded pictures in a template. The PDF wizard is great if you like to design your book from scratch and then upload it. This may be good if you have a specific look you want for the book. The Designer Templates are for more advanced users who design their own templates and can even sell them.
The Book Designer feature was very easy to use. I played around with it for a few days to get the feel of how it works and uploaded the pictures I wanted to use. In Book Designer, I easily switched around pages, deleted extras and added or removed photos from my template.
If you are just starting out with Total Yearbooks, I recommend starting with Book Designer. It makes it easy for you to move things around with it until you are happy with your creation.
The first step is to upload your pictures and add them to your template.
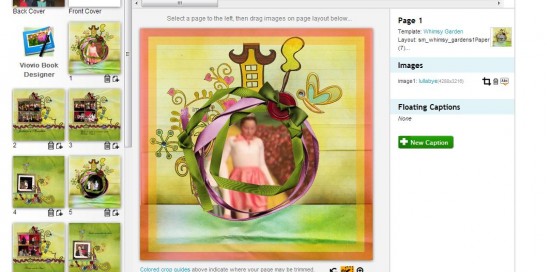
In Book Designer, they have a feature called "Auto Fill," which will automatically add all your photos into your templates. That is a quick and easy way to get your book done, and very convenient if you don’t mind the order of the pictures. However, if you have a pre-planned sequence you want for your book, you should drag and drop each photo manually into the template.
When you’re finished you can add captions to your pages. You can select font, colo,r and size of the text you wish to display. Before clicking “Save,” you can scroll up the page a little bit and click on the text box. Then you can place the box wherever you like on the page.
What happens if you realized you have some pages out of order? Not a problem. Right next to the “Auto Fill” button is an “Arrange Pages” button. When you click on it you can drag the pages in the order your prefer.
Once you are finished designing the book, the second step is to design the cover.
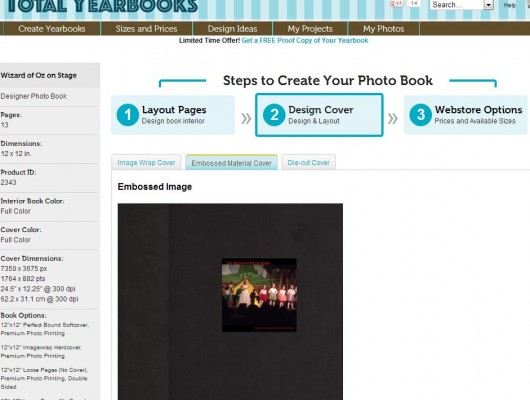
You have an option to upload a picture or just use text. It’s all up to you. I did find this step a little bit harder to do: I had a hard time figuring out how to change the background colors or go back to an older look I liked, etc.
Once your cover is finished you are ready for the third step, “Webstore Options.”
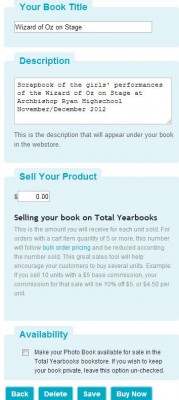
Since my book was a scrapbook and not a school yearbook, I opted to keep my book private instead of public. However, if your book is for a school or home school, this is the place where you can set up your book to be sold online. You will add your book title, enter a a description, and set a price. If your book is for sale online publicly, be sure to check the box at the bottom right of this page labeled “Availability.” If it is private, be sure this box is NOT checked.
And that’s it.
When you’re ready, you can purchase your book. Checking out was easy and painless. Prices depended on style and how many pages are in the book.
Overall, I enjoyed using the website and designing a memory book.
It’s been years since I made one for my family, so I think they will enjoy it, too. I liked how easy it was to upload the pictures and to drag and drop them in the templates. This feature was convenient and saved me a bunch of time.
I also loved how you could easily upload more pictures to your gallery – even while in the middle of the project. Often times I didn’t even have to leave the page I was working on.
My favorite feature on the website, however, is the hover feature. When you are about to drag a photo from your gallery into the template, if you hover for a second an enlarged icon of the photo pops up. This is great because you can see right away if the photo really is the photo you want on this page. It was a great time saver.
One thing I’d like to see more of is more kid-centered and more religious templates. Since this is designed to target home schools, I think both themes would fit in well.
This is a fun website and definitely worth a try.
Have you tried it yet?
Let me know what you think.
The fun for you: a giveaway!
We have a $50 gift certificate for one lucky winner! Leave your name in the comments by Midnight PST on February 14, 2013.
Additional savings: Right now, Total Yearbooks is having a promotion where you can get a free proof copy of your yearbook, no coupon needed. Check it out.
Read more of our Tech Talk columns.
Copyright 2013 Jennifer Gladen
About the Author


Comments