"The bread." We were all standing around the island in my friend’s kitchen, munching on appetizers and chatting and before us sat two loaves of fresh, warm Amish white bread. I hate to admit that the veggie platter and fruit tray were sadly neglected, but it’s true. The bread, with sweet cream butter, was the star of the night.
It’s great bread for just eating fresh, it makes a good crunchy toast with jam, it’s perfect as an accompaniment to soup, and works great for hearty picnic sandwiches. It also makes a great addition to whatever meal you might be bringing to a friend when she’s had a baby.
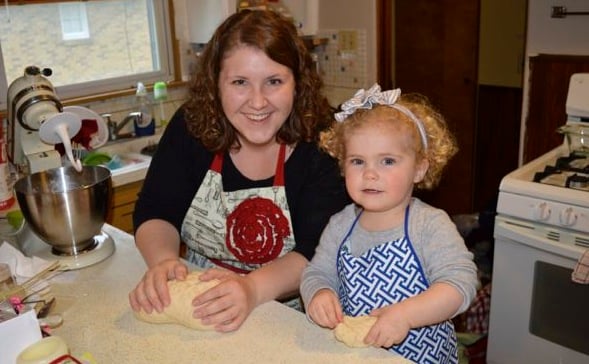
Like most of my go-to recipes, the thing I love most about it is that it seems to be fail-proof and foolproof! The recipe is simple and the ingredients do what the instructions say they will, every time. It’s so easy that I let my toddler help!
 Making Bread, 2016, copyright Megan Swaim. All rights reserved.
A few weeks ago we made several batches of this bread together and I suspect it will be one of those treasured memories for all my life: side-by-side at the kitchen counter, wearing aprons, making a considerable mess and sharing sweet conversation. Her excitement and joy over the bread’s various stages was just too much – watching the yeast get foamy, the bread rise quickly, forming the loaves and watching them grow and bake in the oven, and then enjoying the warm, sweet goodness with a dollop of butter.
So the next rainy spring afternoon, grab your kids, a couple of aprons, clear off the counter and get baking!
“The Bread” (More commonly known as Amish White Bread)
Ingredients:
2 cups warm water
2/3 cup sugar (white, granulated)
2 packages yeast
1 ½ tsp. salt
¼ cup vegetable or canola oil
6 cups flour
Directions:
Start with the warm water in a bowl and pour in the sugar; stir until dissolved. Add the yeast and give a little stir. Let it sit for 10 minutes or until it gets creamy and foamy.
Then add the salt and oil right into the bowl. Mix in the flour one cup at a time, stirring gently until it comes together. Remove the dough (it will be sticky still) and knead on a lightly floured surface, sprinkle with extra flour as needed until it’s no longer sticky but soft and stretchy.
Spray a bowl with cooking spray and dampen a tea towel or very thin kitchen towel. Transfer the dough to the bowl and cover with the towel; put in a warm, dark place if possible and allow to rise until it’s doubled in size. (About 1 hour for regular yeast, 30-40 minutes for fast acting).
Punch the dough down and knead for a few more minutes. If making two loaves, divide the dough in half, shape and place in 9x5-inch loaf pans that have been sprayed generously with cooking spray.
Allow the loaves to rise for 30 more minutes, until the dough has risen above the edge of the pan and then bake for about 30 minutes at 350 degrees.
Some notes about making the bread:
It’s very easy to halve this recipe, but if you make one loaf, you’ll find yourself wishing you’d made two as soon as the first is devoured!
If you are making the dough in a mixer, the water will cool off a bit as soon as it hits the metal, so adjust the temperature accordingly.
I’ve made the bread with both bread flour and also all-purpose flour and we actually liked the all-purpose flour better.
If you’re going to make this a fun family activity, I’d suggest trying fast-rising active yeast so your little ones don’t have to wait quite so long to see results.
Sea salt can be a nice substitute for table salt in this bread!
The bread comes together pretty quickly and seems to require less kneading time than other breads I’ve made. Once the dough is soft and elastic, put it down and let it be (the hardest part for little hands).
If you like your bread with a lighter crust, take it from the oven at 20 minutes for 1 loaf, 25 for 2.
A thank you to Ann Gray from St. Vincent de Paul in Fort Wayne, IN, for introducing me to this bread and including this recipe in the parish cookbook.
Copyright Megan Swaim 2016.
About the Author


Comments