
Editor's note: Today I have great news for our readers! Jen Frost, the creative sweetie behind the blog Enter Under My Roof, is joining us as a weekly contributor! Be on the lookout every Monday for great ideas, crafts and inspirational reflections from Jen -- perfect for moms like me who are always looking for fun ways to share our faith! LMH
I know, I know...it's barely been the First Sunday of Lent and I already have a project for the Second Sunday of Lent. I was just too excited about this to not share!!! So, consider this a bonus in that you now have an entire week to pick up the supplies. I promise, there aren't many!
They say inspiration can strike at any time, and for this project, that's exactly what happened. I'm in a MOPS group (which I highly recommend to any moms of faith with children) and we made a craft last week at our meeting. It was the perfect craft, because I had been trying to think of a new, creative activity for teaching the Stations of the Cross and voila! I realized the activity we did could be modified to meet my Stations project. Perfect!
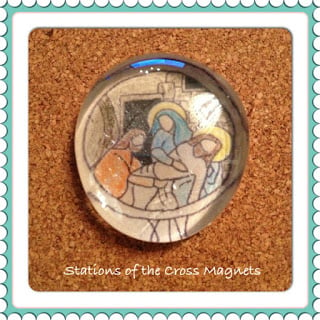
So, without further adieu, I bring you Stations of the Cross magnets!
These magnets are a great teaching tool. They are very easy to make (see instructions and downloadable template below), and have the added benefit of a) providing you an opportunity to teach each station as you make the magnet for that specific station and b) can be played with / reordered / sorted on the fridge as a teaching tool not only during Lent but year-round should you chose to leave them up. As these print small, the second page of the downloadable template is a list of all stations in a font you can actually read.
I searched quite a while for the right pattern for the magnets - and found amazing hand-drawn stations by Melissa, over at St. Brigid's Academy. She's so talented! Her inspiration came from Gospel Glass - be sure to check out their designs, too.
WHAT YOU NEED
- 14 stations printable (download free template here - again, credit goes to Melissa for creating these. All I did was shrink them down to the right size). A tip: don't use markers...when I was testing this out, I colored the first with Crayola markers and - when I applied the glue - the colors ran. I had great success with colored pencils. Crayons would probably work great, too.
- 14 large 1.5"-2" glass "jewels" (you can find them at most craft stores - I bought mine at Michaels with a coupon for about $1.50).
- Clear tacky glue. Be sure it is the gel kind that comes in a bottle. Most kinds will work as long as it's a gel and says it dries clear.
- Magnets. STRONG MAGNETS.
- Glue gun (unless your magnets are sticky on one side)
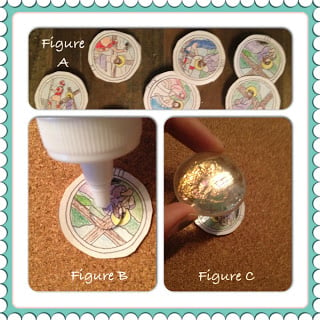
- Color and cut out the 14 circles representing each of the 14 stations (see Figure A)
- Squirt glue onto the PHOTO (the top) part of each paper circle, one at a time (see Figure B)
- Place the glass jewel/marble on top of the photo and lightly press down to get out the air and ensure the glue flows to the edges of the paper circle (see Figure C)
- Repeat 13 times, and let dry
- Place or glue the magnet on the back of each piece of paper, and enjoy!
Copyright 2013 Jen Frost
About the Author

Jen Frost
Jen Frost is a Catholic quilter and crafter who evangelizes through fabric! She’s a pattern writer, quilt designer, and book author about liturgical living in the home. She loves Instagram, and writes and quilts each week at Faith and Fabric. Subscribe to the newsletter to join the fun, as well as receive great sewing tips and discounts, each month!



.png?width=1806&height=731&name=CatholicMom_hcfm_logo1_pos_871c_2728c%20(002).png)
Comments